Smooth Video Game Emulation in Emacs
I have a lengthy TODO.org of things I might eventually implement for Emacs, most of which are not exactly useful, are challenging to do or fulfill both conditions. A NES emulator fits all of these criteria neatly. I’ve kept hearing that they can run on poor hardware and learned that the graphics fit into a tiled model (meaning I wouldn’t have to draw each pixel separately, only each tile), so given good enough rendering speed it shouldn’t be an impossible task. Then the unexpected happened, someone else beat me to the punch with nes.el. It’s an impressive feat, but with one wrinkle, its overall speed is unacceptable: Mario runs with a slowdown of over 100x, rendering it essentially unplayable. For this reason I adjusted my goals a bit: Emulate a simpler game platform smoothly in Emacs at full speed.
Enter the CHIP-8. It’s not a console in that sense, but a video game VM designed in the 70ies with the following properties:
- CPU: 8-Bit, 16 general-purpose registers, 36 instructions, each two bytes large
- RAM: 4KB
- Stack: 16 return addresses
- Resolution: 64 x 32 black/white pixels
- Rendering: Sprites are drawn in XOR mode
- Sound: Monotone buzzer
- Input: Hexadecimal keypad
It’s perfect. Sound is the only real issue here as the native sound support in Emacs is blocking, but this can be worked around with sufficient effort. Once it’s implemented there’s a selection of almost a hundred games to play, with a few dozen more if you implement the Super CHIP-8 extensions. I’d not have to implement Space Invaders, Pacman or Breakout with gamegrid.el. What could possibly be hard about this? As it turns out, enough to keep me entertained for a few weeks. Here’s the repo.
General strategy
First of all, I’ve located a reasonably complete looking ROM pack. It’s not included with the code as I’m not 100% sure on the legal status, some claim the games are old enough to be public domain, but since there are plenty of new ones, I decided to go for the safe route. Sorry about that.
Cowgod’s Chip-8 Technical Reference is the main document I relied upon. It’s clearly written and covers nearly everything I’d want to know about the architecture, with a few exceptions I’d have to find out on my own. Another helpful one is Mastering CHIP-8 to fill in some of the gaps.
To boot up a CHIP-8 game on real hardware you’d use a machine where the interpreter is loaded between the memory offsets #x000 and #x200, load the game starting at offset #x200, then start the interpreter. It would start with the program counter set to #x200, execute the instruction there, continue with the next instruction the program counter points to, etc. To make things more complicated there’s two timers in the system running at 60Hz, these decrement a special register if non-zero which is used to measure delays accurately and play a buzzing sound. However, there is no specification on how fast the CPU runs or how display updates are to be synchronized, so I had to come up with a strategy to accomodate for potentially varying clock speeds.
The standard solution to this is a game loop where you aim at each cycle to take a fixed time, for example by executing a loop iteration, then sleeping for enough time to arrive at the desired cycle duration. This kind of thing doesn’t work too well in Emacs, if you use sit-for you get user-interruptible sleep, if you use sleep-for you get uninterruptable sleep and don’t allow user input to be registered. The solution here is to invert the control flow by using a timer running at the frame rate, then being careful to not do too much work in the timer function. This way Emacs can handle user input while rendering as quickly as possible. The timer function would execute as many CPU cycles as needed, decrement the timer registers if necessary and finally, repaint the display.
Each component of the system is represented by a variable holding an appropriate data structure, most of which are vectors. RAM is a vector of bytes, the stack is a vector of addresses, the screen is a vector of bits, etc. I opted for using vectors over structs for simplicity’s sake. The registers are a special case because if they’re represented by a vector, I’d need to index into it using parts of the opcode. Therefore it would make sense to have constants representing each register, with their values being equal to the value used in the opcode. Initially I’ve defined the constants using copy-paste but later switched to a chip8-enum macro which defines them for me.
The built-in sprites for the hex digits were shamelessly stolen from Cowgod’s Chip-8 technical reference. They are copied on initialization to the memory region reserved for the interpreter, this allows the LD F, Vx instruction to just return the respective address. When implementing extended built-in sprites for the Super CHIP-8 instructions there was no convenient resource to steal them from again, instead I created upscaled versions of them with a terrible Ruby one-liner.
Basic Emulation
For debugging reasons I didn’t implement the game loop at first, instead I went for a loop where I keep executing CPU instructions indefinitely, manually abort with C-g, then display the display state with a debug function that renders it as text. This allowed me to fully concentrate on getting basic emulation right before fighting with efficiency concerns and rendering speed.
For each CPU cycle the CPU looks up the current value of the program counter, looks up the two-byte instruction in the RAM at that offset, then executes it, changing the program counter and possibly more in the process. One unspecified thing here is what one does if the program counter points to an invalid address and what actual ROMs do in practice when they’re done. Experimentation showed that instead of specifying an invalid address they fall into an infinite loop that always jumps to the same address.
Due to the design choice of constantly two-byte sized instructions, the type and operands of each instruction is encoded inline and needs to be extracted by using basic bit fiddling. Emacs Lisp offers logand and ash for this, corresponding to &, << and >> in C. First the bits to be extracted are masked by using logand with an argument where all bits to be kept are set to ones, then the result is shifted all the way to the right with ash using a negative argument. Take for example the JP nnn instruction which is encoded as #x1nnn, for this you’d extract the type by masking the opcode with #xF000, then shift it with ash by -12. Likewise, the argument can be extracted by masking it with #x0FFF, with no shift needed as the bits are already at the right side.
A common set of patterns comes up when dissecting the opcodes, therefore the chip8-exec function saves all interesting parts of the opcode in local variables using the abbreviations as seen in Cowgod’s Chip-8 technical reference, then a big cond is used to tell which type of opcode it is and each branch modifies the state of the virtual machine as needed.
Nearly all instructions end up incrementing the program counter by one instruction. I’ve borrowed a trick from other emulators here, before executing chip8-exec the program counter is unconditionally incremented by the opcode size. In case an instruction needs to do something different like changing it to an jump location, it can still override its value manually.
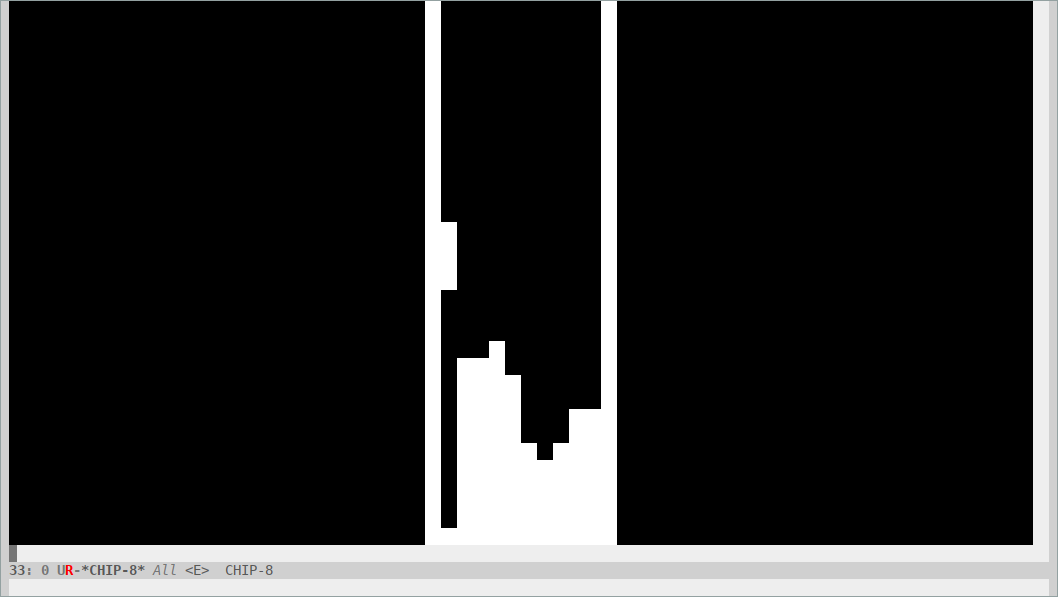
To test my current progress I picked the simplest (read: smallest) ROM doing something interesting: Maze by David Winter. My debug function printed the screen by writing spaces or hashes to a buffer, separated by a newline for each screen line. After I got this one working, I repeated the process with several other ROMs that weren’t requiring any user input and displayed a (mostly) static screen. The most useful from the collection was “BC Test” by BestCoder as it covered nearly all opcodes and tested them in a systematic fashion. Here’s a list of other ROMs I found useful for testing other features, in case you, the reader, shall embark on a similar adventure:
- Jumping X and O: Tests delay timer, collision detection, out of bounds drawing
- CHIP-8 Logo: Tests CALL nnn / RET
- Sierpinski triangle: Slow, tests emulation speed
- Zero: Animation, tests rendering speed (look for the flicker)
- Minimal Game: Tests SKP Vx
- Keypad Test: Tests LD Vx, K, uncovered a bug in the main loop
- Tetris: Tests SKP Vx, SKNP Vx, playability
- SC Test: Tests nearly all opcodes and a few Super CHIP-8 ones
- Font Test: Tests drawing of small and big built-in sprites
- Robot: Tests drawing of extended sprites
- Scroll Test: Tests scrolling to the left and right
- Car Race Demo: Tests scrolling down
- Car: Tests emulation speed in extended mode
- Emutest: Tests half-pixel scroll, extended sprites in low-res
Debugging and Analysis
Surprisingly enough, errors and mistakes keep happening. Stepping through execution of each command with edebug gets tiring after a while, even when using breakpoints to skip to the interesting parts. I therefore implemented something I’ve seen in Circe, my preferred IRC client, a logging function which only logs if logging is enabled and writes the logging output to a dedicated buffer. For now it just logs the current value of the program counter and the decoded instruction about to be executed. I’ve added the same kind of logging to a different CHIP-8 emulator, chick-8 by Evan Hanson from the CHICKEN Scheme community. Comparing both of their logs allowed me to quickly spot where they start to diverge, giving me a hint what instruction is faulty.
Looking through the ROM as it is executed isn’t terribly enlightening, it feels like watching through a peephole, not giving you the full picture of what’s about to happen. I started writing a simple disassembler which decodes every two bytes and writes their offset and meaning to a buffer, but stopped working on it after realizing that I have a much more powerful tool at hand to do disassembly and analysis properly: radare2. As it didn’t recognize the format correctly, I only used its most basic featureset for analysis, the hex editor. By displaying the bytes at a width of two per row and searching for hex byte sequences with regex support I was able to find ROMs using specific opcodes easily.
Later after I’ve finished most of the emulator, I started developing a CHIP-8 disassembly and analysis plugin using its Python scripting support. I ran into a few inconsistencies with the documentation, but eventually figured everything out and got pretty disassembly with arrows visualizing the control flow for jumps and calls.
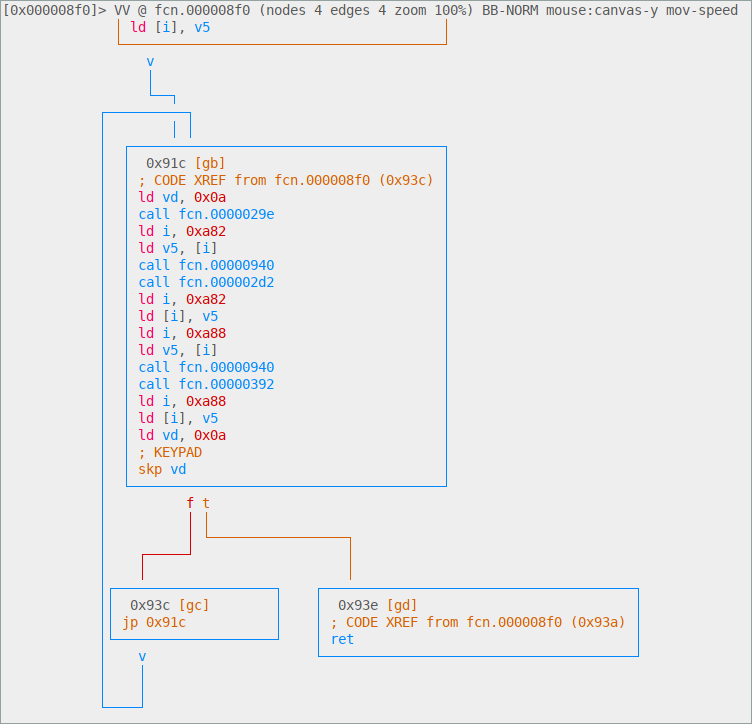
Later I discovered that radare2 actually does have CHIP-8 support in core, you need to enable it explicitly by adding -a chip8 to the command line arguments as it cannot be auto-detected that a file is a CHIP-8 ROM. The disassembly support is decent, but the analysis part had a few omissions and mistakes leading to less nice graphs. By using my Python version as basis I’ve managed improving the C version of the analysis plugin to the same level and even surpassed it as the C API allows adding extra meta-data to individual instructions, such as inline commentary. There is a pending PR for this functionality now, I expect it to be merged soon.
Testing
For maximum speed I set up firestarter to recompile the file on each save, added the directory of the project to load-path, then always launched a new Emacs instance from where I loaded up the package and emulated a ROM file. This is ideal if there isn’t much to test, but it’s hard to detect regressions this way. At some point I decided to give the great buttercup library another try and wrote a set of tests exercising every supported instruction with all edge cases I could think of. For each executed test the VM is initialized, some opcodes are loaded up and chip8-cycle is called as often as needed, while testing the state of the registers and other affected parts of the machinery. It was quite a bit of grunt work due to the repetitive nature of the code, but gave me greater confidence in just messing around with the code as retesting everything took less than a second.
Make no mistake here though, excessively testing the complicated parts of a package (I don’t believe it’s worth it testing the simple parts) is in no way a replacement for normal usage of it which can uncover completely different bugs. This is more of a safety net, to make sure code changes don’t break the most basic features.
Rendering
Retrospectively, this was quite the ride. Normally you’d pick a suitable game or multimedia library and be done, but this is Emacs, no such luxuries here. Where we go we don’t need libraries.
My favorite way of drawing graphics in Emacs is by creating SVG on the fly using the esxml library. This turned out to be prohibitively expensive, not only did it fail meeting the performance goals, it also generated an excessive amount of garbage as trees were recursively walked and thrown away over and over again. A variation of this is having a template string resembling the target SVG, then replacing parts of it and generating an image from them. I attempted doing this, but quickly gave up as it was too bothersome coming up with suitable identifiers and replacing all of them correctly.
I still didn’t want to just drop the SVG idea. Considering this was basically tiled graphics (with each tile being an oversized pixel), I considered creating two SVG images for white and black tiles respectively, then inserting them as if they were characters on each line. The downside of this approach was Emacs’ handling of line height, I couldn’t figure out how to completely suppress it to not have any kind of gaps in the rendering. gamegrid.el somehow solves it, but has rather convoluted code.
At this point I was ready to go back to plain text. I remembered that faces are a thing and used them to paint the background of the text black and white. No more annoying gaps. With this I could finally work and started figuring out how to improve the rendering. While the simple solution of always erasing the buffer contents and reinserting them again did work, there were plenty of optimization possibilities. The most obvious one was using dirty frame tracking to tell if the screen even needed to be redrawn. In other words, the code could set a chip8-fb-dirty-p flag and if the main loop discovered it’s set, it would do a redraw and unset it. Next up was only redrawing the changed parts. For this I’d keep a copy of the current and previous state of the screen around, compare them, repaint the changed bits and transfer the current to the previous state. To change the pixels in the buffer I’d erase them, then insert the correct ones.
The final optimization occurred me much later when implementing the Super CHIP-8 instructions. It was no longer possible to play games smoothly at quadrupled resolution, so I profiled and discovered that erasing text was the bottleneck. I considered the situation hopeless, fiddled around with XBM graphics backed by a bit-vector and had not much luck with getting them to work nearly as well at low resolution. It only occurred me by then that I didn’t try to just change the text properties of existing text instead of replacing text. That fixed all remaining performance issues. Another thing I realized is that anything higher-resolution than this will require extra trickery, maybe even involving C modules.
Garbage Collection Woes
Your code may be fast, your rendering impeccable, but what if every now and then your bouncing letters animation stutters? Congratulations, you’ve run into garbage collection ruining your day. In a language like C it’s much more obvious if you’re about to allocate memory from the heap, in a dynamic language it’s much harder to pin down what’s safe and what’s not. Patterns such as creating new objects on the fly are strictly forbidden, so I tried fairly hard to avoid them, but didn’t completely succeed. After staring hard at the code for a while I found that my code transferring the current to the old screen state was using copy-tree which kept allocating vectors all the time. To avoid this I wrote a memcpy-style function that copied values from one array to another one.
Another sneaky example was the initialization of the emulator state which assigned zero-filled vectors to the variables. I noticed this one only due to the test runner printing running times of tests. Most took a fraction of a millisecond, but every six or so the test took over 10 milliseconds for no obvious reason. This turned out to be garbage collection again. I rediscovered the fillarray function which behaves much like memset in C, used it in initialization (with the vectors assigned at declaration time instead) and the pauses were gone. No guarantees that this was the last of it, but I haven’t been able to observe other pauses.
Sound
If your Emacs has been compiled with sound support there will be a play-sound function. Unfortunately it has a big flaw, as long as the sound is playing Emacs will block, so using it is a non-starter. I’ve initially tried using the visual bell (which inverts parts of the screen) as a replacement, then discovered that it does the equivalent of sit-for and calling it repeatedly in a row will in the worst case of no pending user input wait as long as the intervals combined. There was therefore no easy built-in solution to this. To allow users to plug in their own solution I defined two customizable functions defaulting to displaying and clearing a message: chip8-beep-start-function and chip8-beep-stop-function.
The idea here is that given a suitable, asynchronous function you could kick off a beep, then later stop it. Spawning processes is the one thing you can easily do asynchronously, so if you had a way to control a subprocess to start and stop playing a sound file, that would be a good enough solution. I then remembered that mplayer has a slave mode and that mpv improved it in a multitude of ways, so I looked into the easiest way of remote controlling it. It turns out that mpv did away with slave mode in favor of controlling it via FIFO or a socket. To my surprise I actually made it work via FIFO, the full proof of concept can be found in the README.
User input
The CHIP-8 supports two ways of checking user input: Checking whether a key is (not) pressed (non-blocking) and waiting for any key to be pressed (blocking). Doing this in a game library wouldn’t be worth writing about, but this is Emacs after all, there is only a distinction between key up and down for mouse events. After pondering about this issue for a while I decided to fake it by keeping track of when keys have been last pressed in a generic key handler function, then comparing that timestamp against the current time: If it’s below a reasonable timeout, the key is considered pressed, otherwise it isn’t.
Solving the other problem required far more effort. The emulator was at this point sort of a state machine as I’ve tracked whether it was running with a boolean variable to implement a pause command. I’ve reworked the variable and all code using it to be mindful of the current state: Playing, paused or waiting for user input. This way the command merely changed the current state to waiting for input, set a global variable to the register to be filled with the pressed key and set the stage for the generic key handler function to continue execution. If that function detected the waiting state and a valid key has been pressed, it would record it in the respective register and put the emulator into playing state again.
Actually testing this with a keypad demo ROM unveiled a minor bug in the interaction between the main loop and the redrawing logic. Remember that a number of CPU cycles were executed, then a redraw was triggered if needed? Well, imagine that in the middle of the CPU cycles to be executed the state were changed to waiting and the redraw never happened! This would produce an inconsistent screen state, so I changed it to do a repaint immediately. Furthermore, if the state changed to waiting, the loop would still execute more cycles than needed (despite it being a blocking wait), therefore I had to add an extra check in the main loop’s constant amount of cycling whether the state changed and if yes, skeep the loop iteration alltogether.
Super CHIP-8
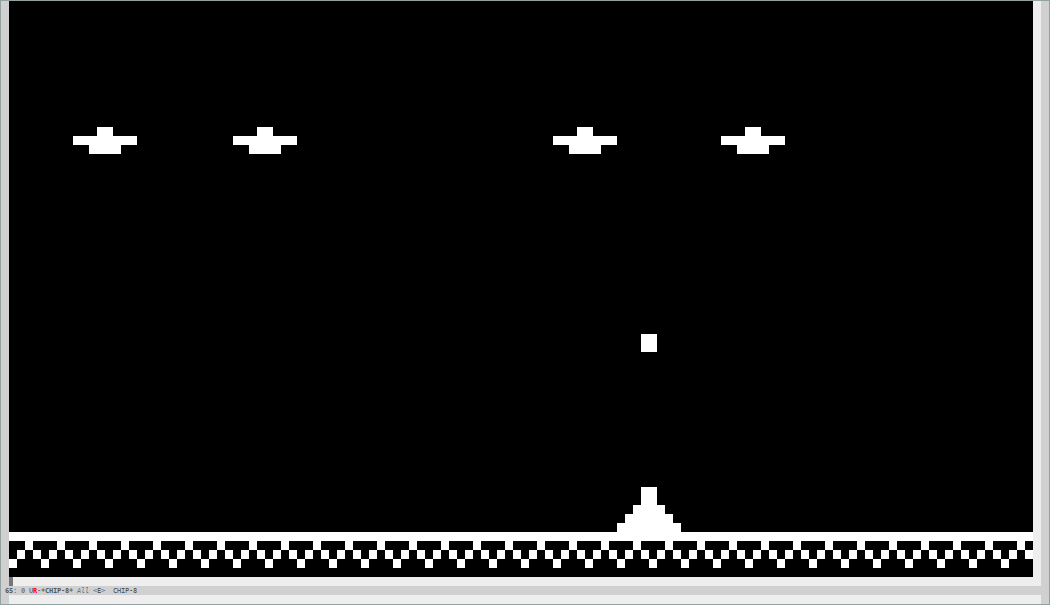
At this point I was pretty much done with implementing the full CHIP-8 feature set and started playing games like Tetris, Brix and Alien.

Yet I wasn’t satisfied for some strange reason. I probably longed for more distraction and set out to implement the remaining Super CHIP-8 instructions. Unlike the main instruction set these weren’t nearly as well documented. My main resource was a schip.txt file which briefly describes the extra instructions. The most problematic extension is the extended mode which doubles the screen dimensions, requiring a clever way to draw a bigger or smaller screen whenever toggled. There are two ways of implementing such a thing: Drawing to one of two separate screen objects and painting the correct one or alternatively, always drawing to a big screen and rendering in a downscaled mode if needed. For simplicity’s sake I went with the first option.
The extra scroll extensions allow game programmers to efficiently change the viewport (though for some reason they forgot about an instruction scrolling up). My challenge here was to change the screen’s contents in-place, for this to be done correctly extra care was necessary to not accidentally overwrite contents you needed to move elsewhere. The trick here is to iterate in reverse order over the screen lines if necessary.
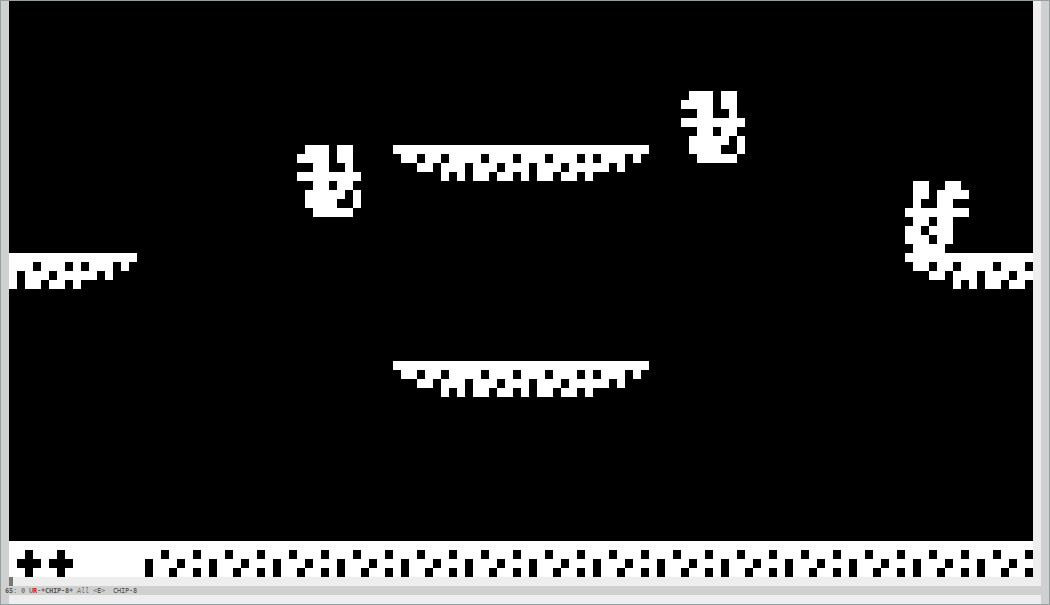
A few more instructions and optimizations later and I was ready to play the probably silliest arcade game ever conceived, Joust. The sprites in the picture below are supposed to be knights on flying ostrichs trying to push each other down with their lances, but they look more like flying rabbits to me.
Other Musings
Writing an emulator gives you great insight in how a machine actually works. Details like memory mapping you glossed over feels far more intuitive once you have to implement it yourself. One of the downsides is that I didn’t play games for my own enjoyment, but to further improve the emulator and understand the machine.
A few games and demo ROMs revealed bugs in the emulator, such as how to deal with drawing sprites that go outside the boundaries. Cowgod’s Chip-8 Technical Reference tells you to do wrap-around, but Blitz by David Winter seems to think otherwise, when rendered with wrap-around the player sprite collides immediately into a pixel on the edge and the “GAME OVER” screen is displayed. I decided in this case to forego that recommendation and clip the rendering to the screen edges.
It’s not always easy to make such decisions. Some quirks seem fairly reasonable, such as preferrably setting the VF flag to indicate an overflow/underflow condition for arithmetic, although it’s not always specified. Some quirks seem fairly obscure, such as the interpretation of Super CHIP-8 extensions in low-resolution mode: A demo insists that instead of drawing a high-resolution 16 x 16 sprite it should be drawn as 8 x 16 instead. As this doesn’t appear to affect any game and requires significant support code I decided against implementing it. In one case I was conflicted enough between the different interpretation of bit shifting operators that I introduced a customizable to toggle between both, with the incorrect, but popular behavior being the default.